How to Contour Your Face: A Beginner’s Guide to Pro-Level Contouring

**How to Contour Your Face Like a Pro: A Step-by-Step Guide for Beginners** explores the art of face contouring, offering simple techniques and expert tips to sculpt and define your features for a flawless, professional makeup look.
Do you want to know How to Contour Your Face Like a Pro: A Step-by-Step Guide for Beginners? Contouring can seem intimidating, but it’s actually a simple technique that can dramatically enhance your features. This guide provide you the best knowledge about face contouring, offering techniques and tips to sculpt and define your features.
Understanding the Basics of Facial Contouring
Contouring is all about creating shadows and highlights to reshape and define your facial features. By strategically applying a darker contour shade, you can create the illusion of depth, making certain areas recede, while highlighting brings features forward, emphasizing them.
Why is Contouring Important?
Contouring is essential because it adds dimension and structure to your face. It helps define cheekbones, slim the nose, and create a more sculpted jawline. When done correctly, contouring enhances your natural beauty, giving you a polished and refined appearance.
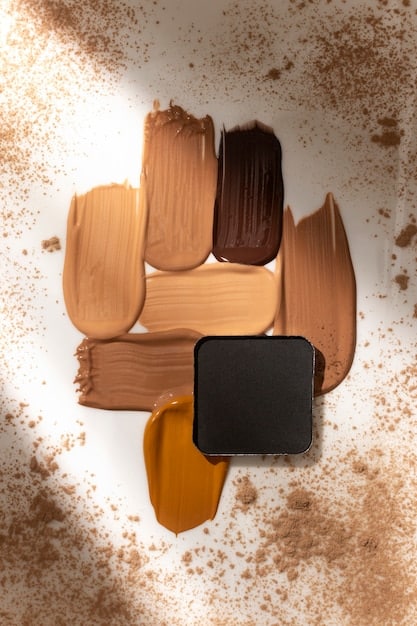
Choosing the Right Contour Shade
Selecting the right contour shade is crucial for a natural look. Opt for a color that is two to three shades darker than your natural skin tone. Avoid shades that are too warm or orange, as they can look unnatural. Cool-toned browns are generally the best choice for mimicking natural shadows.
- Cool-toned browns: Best for creating realistic shadows.
- Matte finish: Avoid shimmer or sparkle to prevent looking unnatural.
- Powder or cream: Choose based on your skin type and preference.
Choosing the right contour shade ensures that your makeup looks natural and enhances your features without appearing harsh or artificial.
Tools You’ll Need for Contouring
To achieve a flawless contour, you’ll need the right tools. These tools will help you apply and blend your contour product seamlessly, ensuring a natural, sculpted look.
Contour Brushes
Investing in good contour brushes is essential. An angled brush is perfect for defining cheekbones, while a smaller, tapered brush is great for contouring the nose and other smaller areas. A fluffy blending brush helps soften the lines for a seamless finish.
Types of Contour Products
Contour products come in various forms, including powders, creams, and sticks. Powder contours are ideal for oily skin types, while cream contours work well for dry skin. Stick contours are convenient for on-the-go application. Experiment to find what works best for your skin type and preference.
- Powder contour: Best for oily skin.
- Cream contour: Ideal for dry skin.
- Stick contour: Convenient for travel and quick touch-ups.
Understanding the different tools and products available will help you tailor your contouring routine to your specific needs and preferences.
Step-by-Step Guide to Contouring Your Face
Now that you have the right tools and products, it’s time to learn the step-by-step process of contouring. Follow these instructions to sculpt and define your face like a pro, starting with a clean, moisturized face.
Step 1: Apply Your Base Makeup
Begin by applying your foundation, concealer, and any other base makeup you typically use. This creates a smooth canvas for your contour and highlight.
Step 2: Contour Your Cheekbones
Locate your cheekbones by feeling for the hollow beneath them. Using an angled brush, apply the contour shade from your ear towards the corner of your mouth, stopping about two fingers away from your nose. Blend well to avoid harsh lines.
Step 3: Contour Your Jawline
To define your jawline, apply the contour shade along your jaw, starting from your ear and moving towards your chin. This creates the illusion of a more sculpted and defined jawline. Blend downwards to avoid a harsh line.
Step 4: Contour Your Nose (Optional)
If you want to slim your nose, use a small, tapered brush to apply the contour shade down the sides of your nose. Blend well to create a natural shadow. You can also add a touch of highlight down the bridge of your nose to further emphasize the slimming effect.
Each step is essential for creating a balanced and natural-looking contour, enhancing your features effectively.
Highlighting to Enhance Your Contoured Face
Highlighting is the perfect complement to contouring. By adding light to certain areas, you can emphasize your features and create a radiant, glowing complexion. Understanding where and how to highlight will elevate your contouring efforts.
Choosing the Right Highlighter
Highlighters come in various forms, including powders, creams, and liquids. Choose a highlighter that is one to two shades lighter than your skin tone. Opt for a shade with a subtle shimmer to create a natural glow.
Where to Apply Highlight
Apply highlighter to the high points of your face, such as the tops of your cheekbones, the bridge of your nose, the Cupid’s bow, and the center of your forehead. These areas naturally catch the light, so highlighting them enhances your features.
- Cheekbones: Creates a sculpted look.
- Bridge of nose: Makes the nose appear slimmer.
- Cupid’s bow: Enhances the lips.
Strategic highlighting enhances the impact of your contour, creating a balanced and radiant makeup look.
Blending Techniques for a Seamless Finish
Blending is the key to a natural-looking contour. Without proper blending, your contour can look harsh and unnatural. Mastering blending techniques is essential for achieving a seamless finish.
Using a Blending Brush
Use a fluffy blending brush to soften the edges of your contour and highlighter. Gently blend the product in circular motions, ensuring that there are no harsh lines. Take your time and blend until the product is seamlessly integrated into your skin.
Avoiding Harsh Lines
To avoid harsh lines, start with a small amount of product and gradually build up the intensity. Regularly clean your blending brush to prevent product buildup, which can make blending more difficult. Focus on softening the edges of the contour rather than trying to erase it completely.
The Importance of Patience
Blending takes time and patience, so don’t rush the process. The more time you spend blending, the more natural your contour will look. Keep blending until you achieve a seamless, airbrushed finish.
Mastering blending techniques ensures that your contour looks natural and enhances your features subtly and effectively.
Common Mistakes to Avoid in Contouring
Contouring can be tricky, and it’s easy to make mistakes, especially when you’re just starting out. Being aware of these common pitfalls can help you avoid them and achieve a flawless contour every time.
Using the Wrong Shade
One of the most common mistakes is using a contour shade that is too dark or too warm. This can make your contour look unnatural and muddy. Always opt for a cool-toned brown that is only two to three shades darker than your natural skin tone.
Applying Too Much Product
Applying too much product can result in harsh, unnatural lines. Start with a small amount of contour and gradually build up the intensity. It’s always easier to add more product than to remove it.
- Harsh lines: Blend thoroughly to soften edges.
- Unnatural appearance: Choose the right shade and amount.
- Muddy look: Avoid warm-toned or overly dark shades.
Forgetting to Blend
Skipping or rushing the blending process is a major mistake. Without proper blending, your contour will look harsh and obvious. Spend plenty of time blending the product into your skin for a seamless finish.
Avoiding these common mistakes will help you achieve a natural, sculpted contour that enhances your features effectively.
| Key Point | Brief Description |
|---|---|
| 🎨 Choosing the Right Shade | Opt for cool-toned browns 2-3 shades darker than your skin. |
| 🖌️ Essential Tools | Use angled brushes for cheekbones and tapered brushes for the nose. |
| ✨ Highlighting | Apply highlighter to cheekbones, nose, and Cupid’s bow. |
| 🔄 Blending is Key | Blend in circular motions to avoid harsh lines. |
Frequently Asked Questions
▼
For fair skin, choose a light, cool-toned brown. Avoid shades that are too dark or orange, as they can look muddy on fair skin tones. A taupe shade often works well.
▼
While bronzer can add warmth to your face, it’s not the same as contour. Contour shades are typically matte and cool-toned to mimic shadows, while bronzers are warmer and often have shimmer.
▼
If you have oily skin, opt for a powder contour. Powders help absorb excess oil and provide a matte finish. Apply with a light hand and blend well to avoid a cakey appearance.
▼
A fluffy, tapered blending brush is ideal for blending contour. The soft bristles help diffuse the product seamlessly into your skin, creating a natural, airbrushed finish.
▼
Clean your contour brushes at least once a week to prevent product buildup and bacteria growth. Clean brushes ensure smoother application and help maintain the health of your skin.
Conclusion
Mastering the art of contouring can transform your makeup routine, adding dimension and definition to your features. By following this step-by-step guide, understanding the right tools and techniques, and avoiding common mistakes, you can achieve a professional-looking contour that enhances your natural beauty. So, pick up your brushes and start sculpting!


